Tarps News Categories
How to Assemble PVC Tarp Dome
How to Assemble PVC Tarp Dome
First, prepare the equipment and materials that you need. You only need three equipments to build this dome, PVC pipe cutters, a bandsaw, and a drill press. A handheld drill could be used, it is just not as convenient and efficient.
Make sure you use ratcheting pipe cutters. You would be doing a lot of cutting.
Materials List:
For the hubs
30' 1" Schedule 40 PVC pipe (There will be excesses.)
130 1' Schedule 40 couplings
26 1/4" x 2" hex head bolts
26 1/4" hex nuts
52 1/4" washers
For the struts
35 Long struts (53 5/16" for an 8' high dome)
30 Short struts (46 7/16" for an 8' high dome)
If you want to customize your own dome to a different radius or do the calculation yourself, here's the formula (all units need to be in inches). You may need to take off six inches from each strut to make up for the length of the hubs.
For the long struts:
strut length = (dome radius x .61803) - 6
For the short struts:
strut length = (dome radius x .54653) - 6
Pipe choice:
Class 200 pipe (thin wall) for the struts.
The dome is light and easy to carry but it is strong enough to hold up tarps, lights, and a flagpole. If you think this is not strong enough, you can use Schedule 40. It is just heavier.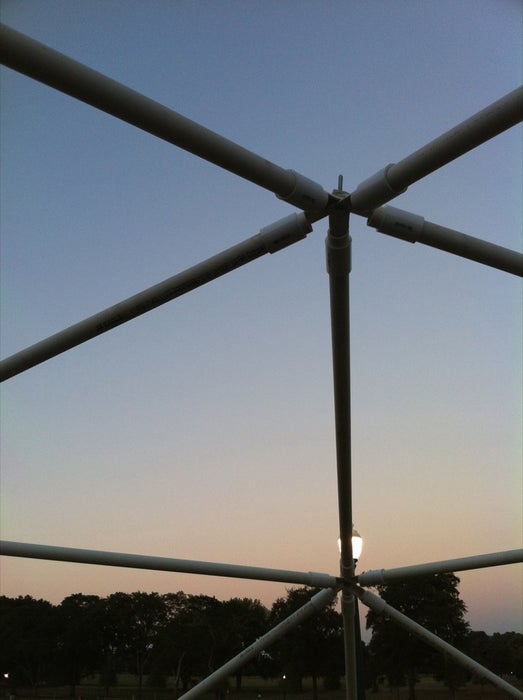
Second step is to make the hubs. Making the hubs is the most difficult, time-consuming, and crucial part of the dome. The hubs are formed by PVC tabs. They are bolted together to make a sturdy and flexible connector between the struts.
Using schedule 40 pipe is essential. Class 200 cannot handle the pressure of holding the dome together without breaking. Schedule 40 is the best pipe to use. It is flexible enough to allow the dome to be assembled without bending precise angles, but sturdy enough to keep from breaking.
You need to make:
10 4-way hubs
6 5-way hubs
10 6-way hubs
You need:
130 4" pieces of 1" schedule 40 PVC
130 couplings
26 1/4" x 2" hex-head bolts
26 1/4 hex nuts
52 1/4 washers
Third, mass producing. Because of the number of pieces involved in the hubs, it is important to be able to mass produce copious quantities of identical pieces.
The most efficient way to do this is with the assembly line method and using jigs to eliminate time consuming measurement.
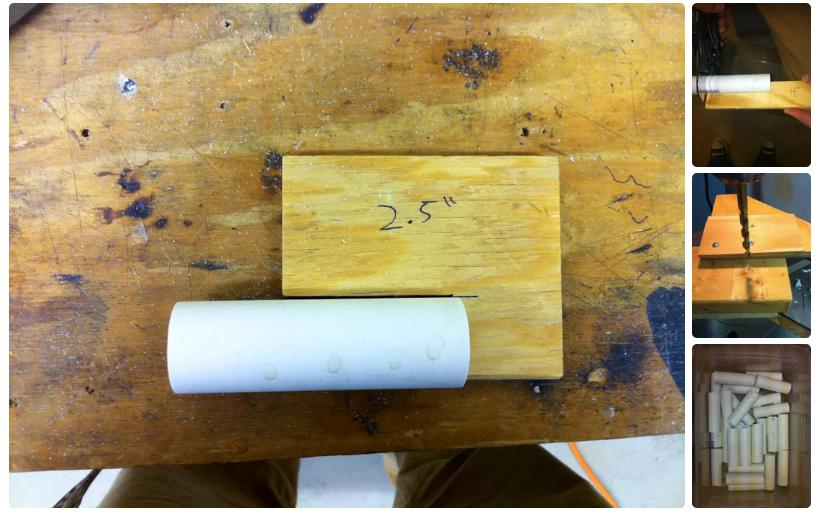
You can make jigs out of plywood, cut to fit over the PVC to show where to cut without marking. This lets you cut all the hub pieces to length very quickly and mark the notches without having to calculate.
As well as cutting, drilling is assisted by a jig. When making the jig, it helps a lot if you come up a way to make the jig hold the workpiece to avoid error.
Mass producing the parts takes less set up time and the entire process gets done faster.
Fourth is about cutting the notches. This is by far the most time consuming and difficult part of making the hubs.
The notch needs to be cut down in the middle of the pipe, to a depth of 2.5 inches. Marking the jigs makes this a little faster.
The blade that you use is also important. The best to use is a one-fourth blade with fine teeth. The coarser toothed blades tend to cut too fast and chip the pipe.

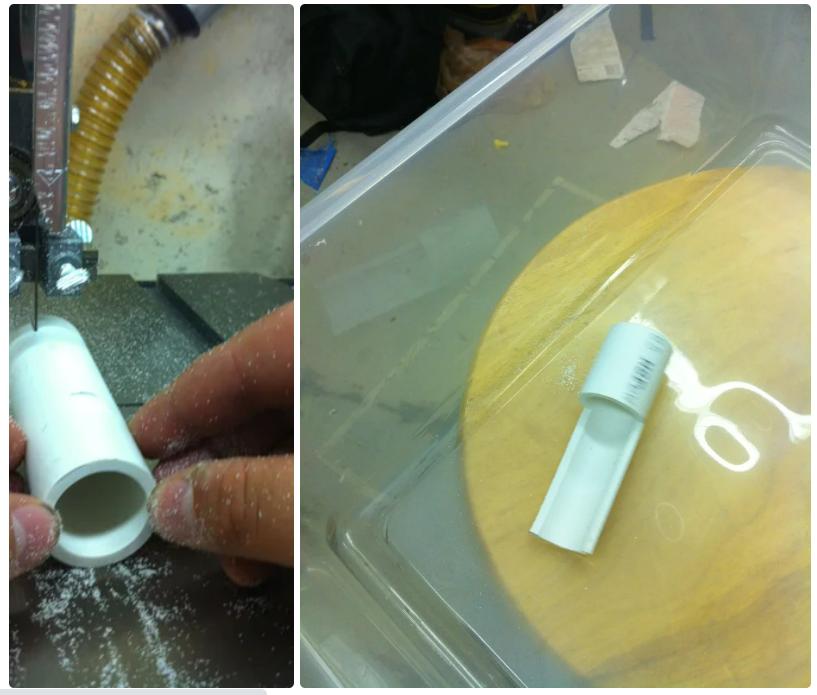
Fifth, flatten the tabs in a vise to make drilling and hub assembly easier. You do not have to do this, but it is worth the effort and makes the hub pieces fit together.
Drill the hub pieces about one-half in from the end of the tab. This gives it enough strength while still making the hubs fit together right. Use a five-eighths bit to let the one-fourth bolts fit without any effort.

Sixth, put the hubs together by threading a one-fourth bolt through the holes. Use 2.5-inch bolts because it leaves enough thread to attach other things, like the dome covering, or lighting on the inside.
If you do not want to have holes in your covering, make sure the bolts face inwards. You can make all the bolts on the bottom hubs face outwards to attach to grommets on the covering.
After the hubs are bolted together, attach couplings to all the tabs.
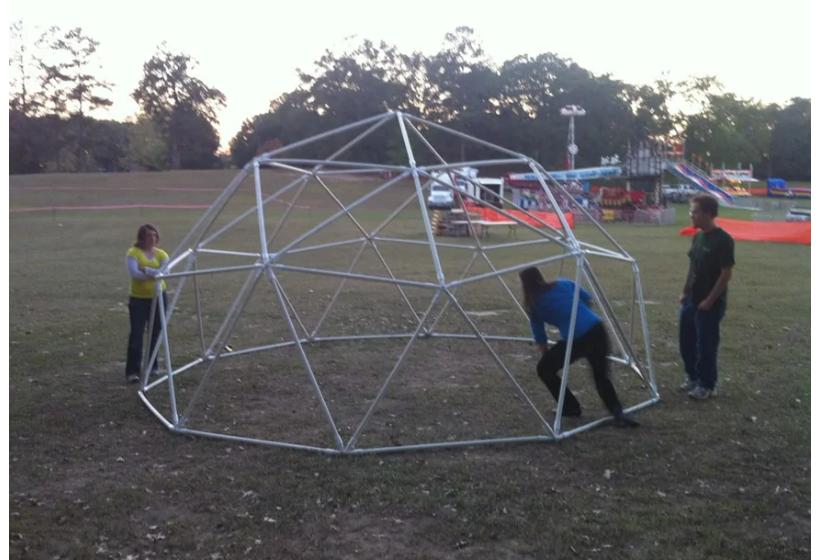
Seventh, assemble the dome. The most rewarding part of building the dome is watching the frame being assembled.
You need:
3-4 helpers
10 4-way hubs
6 5-way hubs
10 6 way hubs
35 Long struts
30 Short struts
1 Large open space
There are many ways to begin putting the dome together. The first thing you need is a diagram of assembly.
Even with use of diagram, this part is still tricky. It is best to build it from the top down, having a few people lift it up for each level. If you are doing it by yourself, building it up from the bottom may work, but you need a ladder. It takes at least three people to set up the dome efficiently.
Finally, cover the dome. You can cover the dome with a few PVC tarps. This worked well enough to block out the wind and look good, but it would never stand up to rain. You can also use a rainproof cover for rainy season.
The tarps can be fit together with a lot of folding, rolling, and duct tape. You can also take off a strut to make a door.
you may also like
- Clear Tarp PVC Vinyl Transparent Plastic Fabric
- Construction Snow Removal Lifting Tarps 23' x 23' & 8 Loops - 18 Oz PVC Coated Vinyl Fabric
- Customized Clear Curtain Plastic Curtain Wall Clear Vinyl Curtains
- 10 Oz Black Mesh Tarp Fabric Rolls Vinyl Woven Pvc Coated Polyester Mesh Fabric
- Lightweight Lumber Tarp For Flatbed Truck
- Standard Lumber Tarps 4 ft Drop Steel Tarp For Flatbed Truck
- 20' X 28' (6' Drop & Flap) Heavy Duty Flatbed Trailer Lumber Tarp - 18 Oz Tarp
- Flated Steel Tarp PVC Lumber Tarp
- Outdoor vinyl curtains transparent tarpaulin with grommets waterproof clear pvc vinyl tarp
- PVC tarpaulin-Diamond Embossing
others also viewed
- How to clean pvc tarp
- How to choose a tarp tent
- Precautions for using pvc tarpaulin
- Custom Heavy Duty Or lightweight PVC Vinyl Dump Flatbed Truck Tarps & Covers For Sale
- First Choosing of PVC Tarpaulin: Mesh Tarps
- What Kind of Paint Would Stick on a PVC Vinyl Tarp That Is Used Outside?
- Why PVC material tarpaulin is so popular
- How to distinguish the quality of tarpaulins? What are the characteristics of PVC-coated fabrics?
- How is PVC tarpaulin made?
- What is PVC Tarpaulin