Tarps News Categories
DIY PVC Tarp Pole
DIY PVC Tarp Pole
First, gather the stuff that you need. What you need varies slightly depending on how you want your poles to look. You can use Plasti Dip Rubber Coating to give the tops a nice smooth finish and use pins instead of bolts and wing nuts to secure the poles so you wouldn't have to worry about losing the wingnut. It’s up to your own choice.
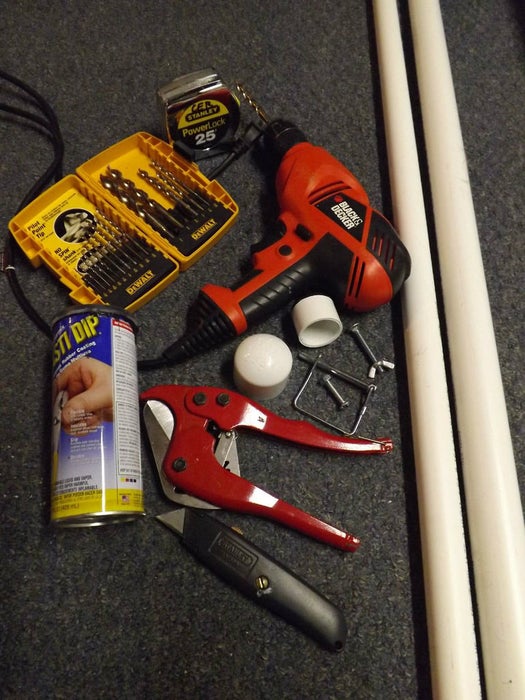
To assemble each pole, you need:
1 - 1 1/4-inch PVC pipe (heavy-duty)
1 - 1 inch PVC pipe (heavy-duty)
1 - 1 1/4-inch end cap
1 - 1 inch end cap
1 - nut and bolt set (approx. 2 1/2 inches long)
1 - 1 1/2-inch bolt and wing nut set (or latching pin)
drill and bits
Utility Cutter
Plasti Dip Rubber Coating (if desired)
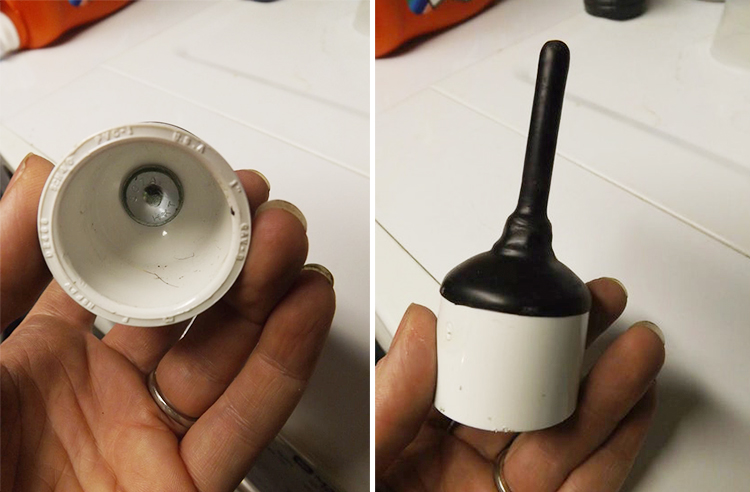
Second, take the 1-inch end cap and drill a hole in the center of the top. Thread your bolt through the hole and secure with the matching nut on top. This is what you use as the 'point' on your pole. You can dip it in Plasti Dip so that the end would be smooth and wouldn't wear away the grommets on the awning.
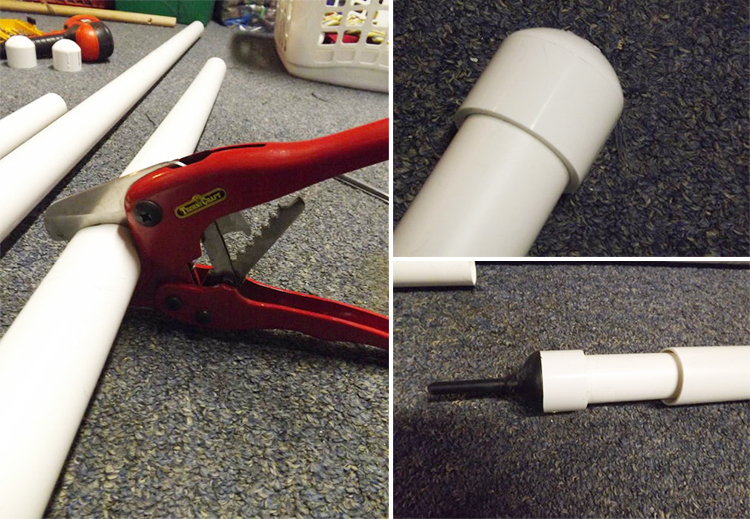
Third, decide how tall you want your poles to be at their maximum length. Divide that amount in half. Use that measurement as the length for the 1-inch pole. This will be the 'inner' pole. Then add a little (6 inches or so) to the length that you determined for the 1-inch pole. Use that measurement to cut the 1 1/4 diameter pole. This is the outer pole and will determine how tall the poles will be when collapsed for transport. Add the 1 1/4 end cap to one end of the 1 ¼ PVC pipe. Slide the 1-inch PVC pipe into the other end. Add the 1-inch cap (with the bolt sticking out) on the exposed end of the 1-inch pipe.
You now have a telescoping set of poles. You're almost done! Now you must add pins or bolts to keep the poles in place while in use.
Fourth, drill it. Remove the inner pole from the outer one. Set your outer pole (the 1 1/4 one) on the ground (or work bench). Measure about 3 inches from the top of the outer pole and mark with a pencil. This is where you will drill your hole for your support pin. Then, holding the outer pole very still drill straight down and completely through both sides at your mark. Use your utility knife to remove any stray bits of plastic around the holes. Measure 4-6 inches up from the bottom of the inner (1 inch) pole and make a line. Slide the poles together just up to where your mark meets the top edge of the outer pole. Using the holes already on the outer pole as guides, drill holes in the 1-inch pole. Repeat this at varying places along the 1-inch pole at whichever heights you wish. You can make six-foot poles so that you can set them at either 6 feet, 5'10", or 5'8" by measuring about 6 inches from the bottom of the inner (1 inch) pole, then again, an additional 2 inches, and an additional 4.
Remember: You can make the poles adjustable to fit your own needs, just adjust your measurements as needed.
When you have finished measuring and drilling your adjustment holes. Slide the poles together as far as they will go. Drill one more set of holes in the inner pole using the outer pole as a guide. These holes will be for holding the poles together while they are not in use.
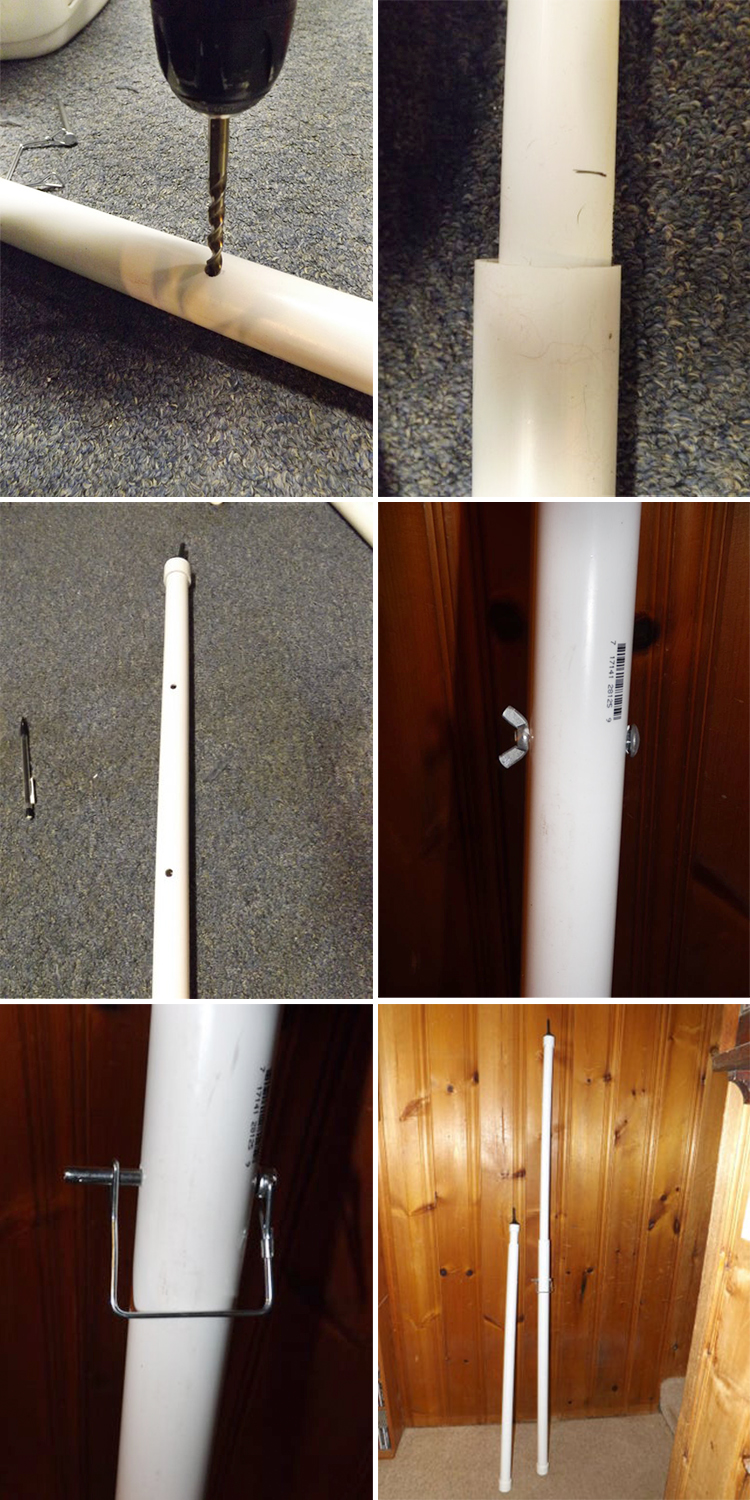
Finally, the easiest part of assembling. Put in your bolts or your pins and test out your poles.
You should be able to slide the inner pole up and down until the holes on both poles line up. Insert a bolt with a wing nut to hold it in place. Or as an alternative, a pin. When not in use you can slide the poles all the way together and insert your pin or bolt. This will hold the poles together while you are transporting them, and it will keep your pin/bolt from getting lost. Good luck!
you may also like
- PVC Clear Vinyl tarp PVC Transparent Tarpaulin
- Custom made 28 ft x 24 ft Vinyl Lumber Tarp for Step deck or Drop Deck Trailer 10' Drop
- 20' X 28' (6' Drop & Flap) Heavy Duty Flatbed Trailer Lumber Tarp - 18 Oz Tarp
- 20' X 27' Heavy Duty Flatbed Trailer Steel Tarp - 18 Oz. Blue Tarp
- Heavy Duty 10oz PVC Coated Mesh Vinyl Tarpaulin Dump Truck Tarps
- Clear Tarpaulin Tent Material
- 5' x 7' Clear Fire Retardant PVC Tarp
- 50% Shade PVC Mesh Tarp for Dump Trucks
- Fire Retardant Clear Vinyl Transparent Tarp PVC Clear Vinyl Tarp Crystal Clear PVC Tarpaulin
- 20' X 18' Lightweight Flatbed Trailer Steel Tarp - 14 Oz. Black Tarp
others also viewed
- Ideal Winter Solution for Outdoor Courtyards: Clear Vinyl Tarps with Grommets
- What is Knife Coated Tarpaulin?
- what would cause pvc tarpaulin to discolor
- How to make pvc tarpaulin more durable? ---Chapter 2: How to Storage
- What is PVC Tarps?
- what is tarping in trucking?
- The Difference Between PE And PVC Tarpaulin
- Performance indicators to be considered for the tarpaulin used to build a fast storage tent
- Tent Fabric Types: Technical Analysis of PVC Coated Fabrics & Materials for Heavy-Duty Tents
- Jumtarps In Mid-America Trucking Show 2023